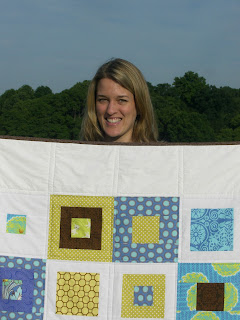
I promised this post a long time ago, but hadn't gotten a moment to put it together. I wanted to share some photos that I took while finishing my sister's wedding quilt, which I named "Something Blue." I gave it to her at her bridal shower, and needless to say, she loved it. Yay!
Here I'm pinning the quilt sandwich.
Quilting. I decided to quilt straight lines 1/4" away from the edge of each block. Essentially, I started at the edge of the quilt and then followed the seams. Since I had added a border, I had to eye-ball it from the edge to the beginning of the blocks, but that was only about 7 inches worth of "guess work" each time. I'm pretty sure no one can tell!
Check out the gloves I bought. I had heard about these texturized gloves to help with the quilting process, but I didn't own a pair for my first two quilts. I saw them on sale one day about a month before I was going to need them for E's quilt, so I snagged them. Boy were they a success! I don't know how I ever managed to get a grip of all that fabric and push it through the sewing machine.
In this picture, you can see how the quilting "framed" each block.
Another close-up view of the quilting pattern: two parallel, straight lines in each direction.
For the first time, I decided to use pre-made binding. What a time-saver! I truly think that this "cheat" alone is what allowed me to finish in time for E's bridal shower. My buddy Jackpot talked me into it (she's always so sensible!) and I'm so glad she did. Also, for the first time, I tried machine stitching the binding to the quilt, with mixed results. While it did save me LOTS of time and I do believe that the quilt will be sturdier because of it, it just did not look as nice as hand-stitching. I might give it another try on my next quilt, but we'll see... the jury's still out.
Tada! The finished quilt top. I took this photo with the help of my friend MMC while at work. Yup, that's the school's football field behind the quilt! Wasn't it a beautiful day?! (PS: Neither one of us was tall enough to hold the quilt completely off the ground. I guess that means it'll definitely be long enough for both my sister and her tall fiance!)
That's me!
I tried a new way of signing this quilt. I typed my message, got my sister-in-law to help me reverse the image, printed it onto special ink-jet "paper" and then ironed it onto a leftover piece of the white fabric. I hand stitched the label to the bottom right-hand corner (on the back). I liked that I could personalize the quilt without stressing over embroidery or handwriting! What do you think?
Here's the back. My hubby is standing on one of our chairs in order to keep it from touching the floor! The stripe on the back has one of each of the ten original fabrics, each set off by a piece of the white fabric. I think it turned out just LOVELY. If I hadn't already promised it to my sister, I definitely would have kept it for myself!
The happy recipient...
...modeling with her quilt,
...and lolling underneath it. I think she liked it!


If she ever decided this quilt is just not something she likes, it has a home with me. Your best one yet! Love it and I am glad that she does too.
ReplyDelete<3 your quilt and you guys... too cute
ReplyDeleteI put it out on the bed for when the future-father-in-law came over to show it off and took some really nice macro pictures while it was out. I'll have to share them with you. :) I also took my first nap under it last weekend - great success! :)
ReplyDelete